I’m trying to add my Dropbox folder to File Explorer so I can access it more easily, but I’m not sure how to set it up. Can anyone guide me through the steps to make this work? I need help making Dropbox integrate with File Explorer.
How to Add a Dropbox Folder to File Explorer
Integrating a Dropbox folder directly into your file explorer can feel like you’re bridging two worlds—the convenience of your local computer setup and the flexibility of cloud storage. While there are multiple ways to achieve this harmony between Dropbox and your PC, let’s walk through an innovative solution that stands out for its efficiency and ease.
Imagine you’re trying to tame the chaos of scattered files across devices—maybe you’re juggling work documents, photos, or personal projects. Now picture this: having your Dropbox account show up in your file explorer as if it’s just another folder on your computer. No sync delays. No unnecessary downloads. Just seamless accessibility!
The Game-Changer: CloudMounter
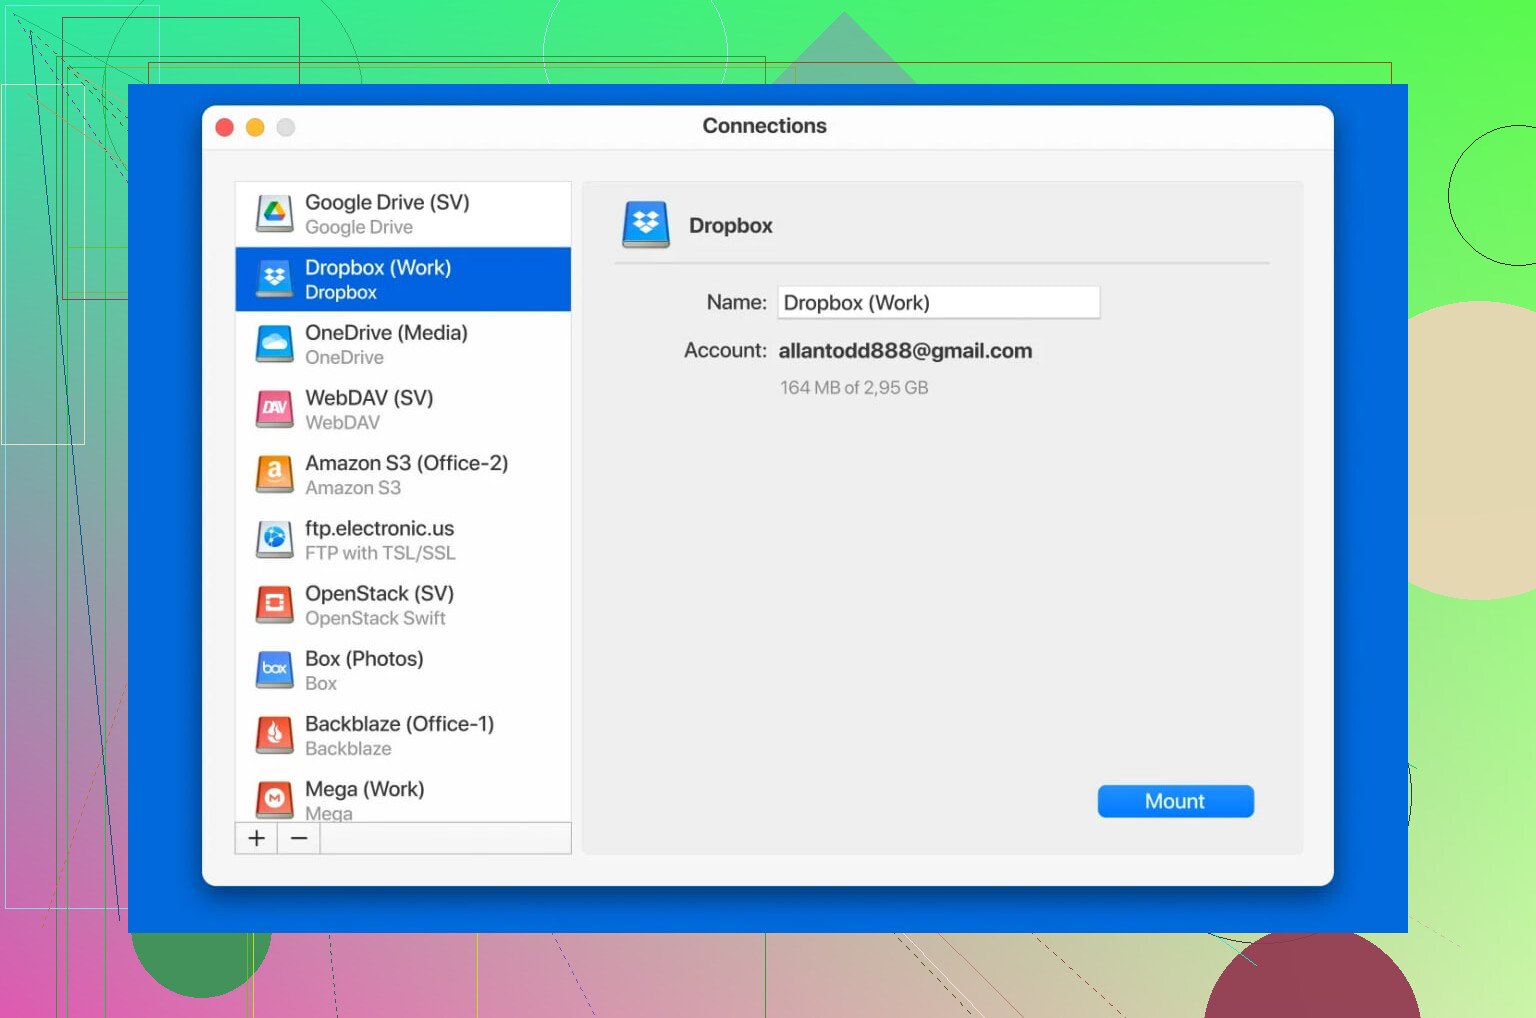
Ever heard of CloudMounter? If not, this might be a revelation. It’s like the Swiss Army knife for connecting cloud storage services directly to your computer. Whether you’re managing a single Dropbox account or juggling several, CloudMounter makes it incredibly simple. Setting it up feels almost magical—no deep dives into tech jargon, no wrestling with settings. You just map Dropbox as a virtual drive, and suddenly it appears within your file explorer, ready to use.
Here’s where it gets even more interesting. With CloudMounter, there’s no need to install Dropbox’s application on your system, which means you won’t need to synchronize files or store a single extra megabyte on your hard drive unless you decide to download them. It’s a “streamlined” approach, literally. Files can stay on Dropbox, but you can effortlessly access, upload, or download them directly from Finder or File Explorer—your computer becomes the command center for the cloud.
Why does that matter? Well, if you’re working on a lightweight laptop or a PC with limited storage, synchronizing entire folders could hog up unnecessary space. With CloudMounter, it’s like opening a massive book without having to carry it around. Additionally, there’s even a free option for managing one account—a nice touch for those taking baby steps into the world of cloud computing.
How to Make it Work:
- Download CloudMounter: Head over to their site, install the app, and fire it up.
- Connect Dropbox: Use the straightforward interface to link your Dropbox account. It’s about as easy as entering your login details—no fuss.
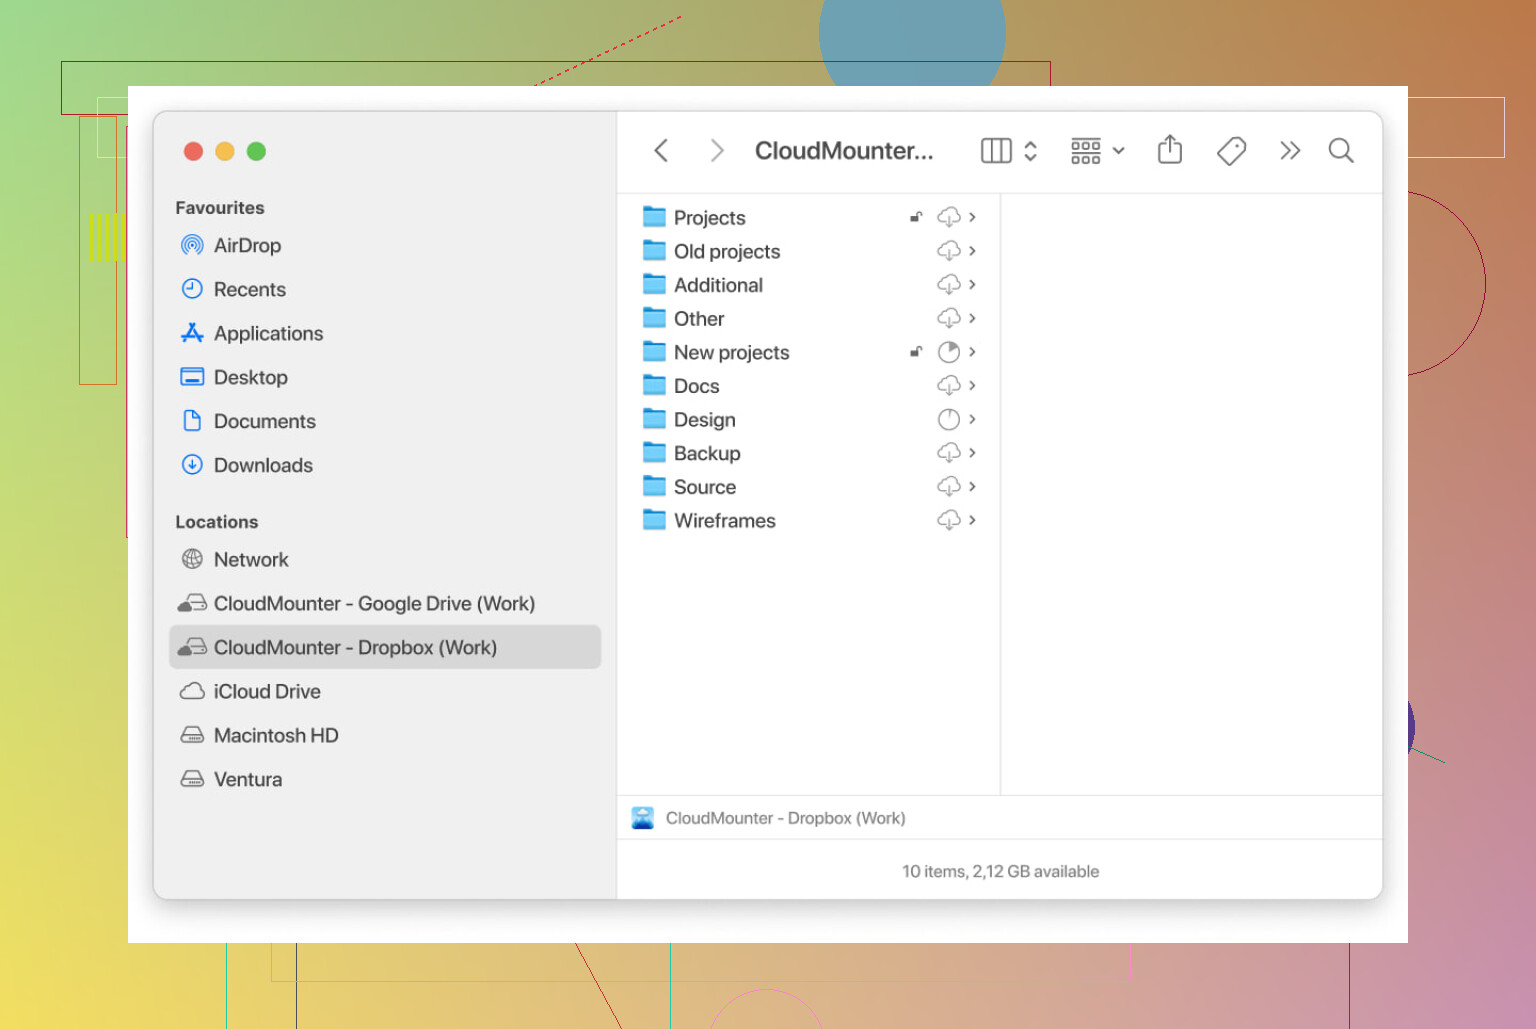
- Map it as a Drive: Assign it a letter (Windows) or let it live in Finder (MacOS)—bam, Dropbox is now a virtual drive at your fingertips.
- Access Files with Simplicity: Open File Explorer (or Finder on Mac), locate the Dropbox drive, and manage your files just as you would with any other folder.
Pretty liberating, right?
---
Built for Modern Workflow
To paint you a picture: Imagine you’re working late one evening, crafting a report. You pull up Dropbox in File Explorer like it’s an external hard drive. Grab the draft you saved earlier that day, make revisions, and save the file back into your Dropbox drive. No extra downloads. No opening a browser. It’s just you and your files, working harmoniously.
This approach is particularly useful for folks who collaborate across teams or devices. Dropbox becomes part of your natural workflow—no disruptions, no drama. Everything’s right where you need it, blending the familiarity of your computer’s ecosystem with the accessibility of cloud storage.
A Final Thought
With tools like CloudMounter, cloud storage solutions like Dropbox stop feeling like remote, untouchable islands. Instead, they become part of your everyday workflow, tightly interwoven with your computer’s operation. Whether you’re a student, professional, or just someone trying to keep personal files in order, this method could simplify your digital life.
So, if more control, flexibility, and space-saving sound appealing, maybe it’s time to give CloudMounter a go.
If you’re looking to integrate Dropbox into your File Explorer, the process is pretty straightforward using the official Dropbox desktop application. While @mikeappsreviewer suggested an alternative tool that skips the installation of Dropbox itself, I’d recommend sticking with Dropbox’s official app for a more seamless, stable experience—especially if you want full sync capabilities. Here’s how you can do it the traditional way:
Step-by-Step Guide to Adding Dropbox to File Explorer:
-
Download the Dropbox App
Go to the Dropbox Download Page and download the desktop app for Windows. It’s lightweight, reliable, and specifically designed for this purpose. -
Install and Sign In
Run the downloaded setup file and install the app. Once you launch it, log in with your Dropbox credentials. -
Sync Your Files
During setup, Dropbox will ask you whether you want to sync all files or select specific folders. If you’re short on storage space, it’s a good idea to select only what you need. -
Check File Explorer
After installation, you’ll see a special Dropbox folder automatically added to File Explorer’s sidebar under ‘Quick Access.’ From here, you can access and manage your cloud files as if they were local. -
Optional Smart Sync
Dropbox has a feature called Smart Sync, which keeps files offline until you actually need them, saving a ton of space while giving you access to all cloud-stored files in File Explorer.
Why the Dropbox App?
Though @mikeappsreviewer mentioned tools like CloudMounter (and yes, you may connect multiple clouds super easily with it), I disagree with ditching Dropbox’s native app entirely. The official app is purpose-built for this feature, offering tighter security, better sync options, and real-time updates. While CloudMounter avoids storing any data locally, it may not work as seamlessly for those who need consistent file syncing.
A Word of Caution
Here’s some food for thought: Cloud-management tools like CloudMounter might simplify multi-account juggling and conserve storage, but they rely on a constant internet connection. If your connection’s down or unstable, you could lose access at the worst possible moment (Murphy’s law, right?). Dropbox’s app, on the other hand, stores synced copies locally so you’re covered even offline.
If you’re happy with the official setup but lack storage space, consider only syncing critical folders. And if you hate commitment (or installing another app), maybe give CloudMounter a shot. Both solutions have their perks, but at the end of the day, it comes down to your workflow preference.
Alright, lemme just jump right in. Adding Dropbox to File Explorer? Straightforward, kinda boring, but hey—here we go. You’ve got two solid routes outlined by @mikeappsreviewer and @byteguru, but lemme add my take in case neither option vibes with you. And yes, there IS another way. This isn’t rocket science, but sometimes it feels like it when you’re knee-deep in cloud shortcuts.
-
Dropbox Standard Method (YES, the Official One)
So, byteguru’s practically preaching the gospel of the Dropbox app. Fine, it works. Install the thing, follow the prompts, and BOOM—your Dropbox folder pops right into File Explorer like magic. It’s sleek, and if you’re into full-on syncing with local storage, it’s perfect. However, here’s the kicker: if you’ve got a huge Dropbox folder and limited disk space, this can get messy fast. You’ll thank me later when you’re not tearing your hair out because your hard drive hit capacity. -
CloudMounter Method (Because Who Doesn’t Love Options?)
Now @mikeappsreviewer really hyped CloudMounter, and honestly? It’s not bad—think of it as a pseudo-hacker move. CloudMounter lets you connect Dropbox directly into File Explorer as a drive without syncing the whole thing. Like, wanna pretend your computer has infinite space? Streamline your cloud life instead. You only download files you actually need, leaving everything else floating up there in cloud bliss. The downside? All this is hanging by the thread of your Wi-Fi connection. Spotty internet—good luck accessing that essential doc. -
Symlink Wizardry (For the Nerds Among Us)
Don’t feel like downloading the Dropbox desktop client or paying for extra tools? Here’s the workaround of ALL workarounds: create a symbolic link (‘symlink’). It’s a shortcut that tells File Explorer, “Yo, treat this Dropbox folder as though it lives here.”- Open Command Prompt (admin mode).
- Use the command:
mklink /J 'C:\PathToNewFolder' 'C:\ActualDropboxFolder'. - Replace those paths with the folder locations on your PC.
Voilà! You’ve got Dropbox in File Explorer without extra software bloat. Yes, it’s nerdy. Yes, it works.
-
Google Drive Instead?
And okay, I might be causing a stir, but have you considered maybe ditching Dropbox for Google Drive? It’s just as easy to integrate with File Explorer and sometimes has fewer hoops to jump through. Don’t @ me.
My take? If you’re looking for quick-and-dirty file access, try the symlink method. If you’ve got space to spare, the official Dropbox app is idiot-proof. And if you’re the adventurous type with trust issues (LOL), give CloudMounter a spin. Three roads diverged in a yellow wood. Choose wisely.
If you’re still pondering your best bet for adding Dropbox to File Explorer, let’s mix things up. Sure, the advice so far has been solid—thanks to the three approaches highlighted by @byteguru (classic Dropbox app), @mike34 (adding a techy twist via symlinks), and @mikeappsreviewer (CloudMounter enthusiast)—but here’s a fresh take with some honest pros and cons about CloudMounter and alternatives.
Option 1: Stick to the Official Dropbox App
The Dropbox desktop app is the easiest and most direct way to integrate Dropbox into File Explorer. Install it, log in, sync what you need, et voilà—your Dropbox folder appears like magic. That said, it’s a double-edged sword. Massive Dropbox accounts could eat up tons of local storage unless you use their “Selective Sync” feature. If you’ve got the storage to spare, though, this is the no-fuss solution. Honestly, this works for 90% of users. Still, for minimalists or storage-strapped folks? Meh.
Option 2: Symlink (The DIY Hero Move)
Creating a symlink like @mike34 suggested lets you integrate Dropbox using native tools. No app bloat, no third-party dependency. Just run a simple command:
mklink /J 'C:\FakeDropboxLink' 'C:\PathToRealDropboxFolder'
Pros? You save space, avoid syncing everything, and have free software glory. The con? This feels like a hack, and if you’re “over” troubleshooting or command-line tinkering, you might want to skip this.
Option 3: CloudMounter—A No-Sync Alternative
Okay, let’s talk CloudMounter, which @mikeappsreviewer pitched as the versatile all-in-one. It’s actually pretty awesome in concept. Instead of syncing Dropbox to eat up your disk space, it virtually mounts Dropbox as a network drive in File Explorer—perfect if you’re managing multiple accounts or a smaller hard drive.
Pros:
- Saves tons of storage since files stay in the cloud.
- Clean, easy setup for Dropbox and other services (Google Drive, OneDrive, etc.).
- Works offline for pre-downloaded files.
Cons:
- Depends heavily on Wi-Fi. Offline? Say goodbye to unsynced files.
- Free version supports only one connection, so power users juggling Google Drive + Dropbox might hit a wall unless they pay.
- It’s another app to maintain/customize.
For anyone constantly worried about disk clutter (hi there, ultrabook users), this is probably the smartest choice. BUT, if your internet’s unreliable, the convenience could backfire.
Option 4: Compare and Contrast (Alternatives?)
While this thread seems to crown CloudMounter as a standout option, don’t sleep on competitors like Cyberduck or Mountain Duck, which also let you access Dropbox without local sync. Both offer freemium models and similar functionality—though CloudMounter tends to have less of a fiddly setup process. Choose whichever fits your budget and workflow.
TL;DR Summary
Want it easy and integrated? Install the Dropbox app. Like free and nerdy? Go for the symlink. But if hard drive space is at a premium and you love the flexibility of jumping between services, CloudMounter could be your MVP—just consider your internet speed before diving in.
Cloud storage doesn’t have to feel like juggling flaming torches. The right tool depends on your needs—so don’t be afraid to experiment, Dropbox-user-extraordinaire!