I found an old WD My Passport external hard drive that sat unused for years, and now I’m trying to recover the files from it. It has important photos and documents, but I’m not sure if the drive is failing or if there’s a safe recovery option I should try first. I need help figuring out the best way to recover data from an old WD My Passport drive without making things worse.
I’ve had this happen with a My Passport more than once, and the first move is always the same. Stop writing anything to the drive. Don’t copy files onto it. Don’t try random repair tools. Don’t save recovered files back to it. Unplug it and pause for a minute.
When a file gets deleted, the data usually stays on the disk for a while. What disappears first is the file system entry pointing to it. So if you keep using the drive, you raise the odds of overwriting the exact blocks you want back. On older WD My Passport HDD units, I’ve had decent recovery results if I moved fast. On the SSD versions, time matters more because TRIM tends to wipe free blocks in the background.
Check Disk Management first
Before you install anything, open Windows Disk Management.
Right-click Start.
Pick “Disk Management.”
Find the WD drive in the list.
This step tells you a lot.
If the drive appears with the correct capacity, like 1TB or 2TB, even if Windows labels it RAW or Unallocated, I’d still treat it as a good DIY recovery case. Usually, the hardware is being detected and the file system is what got damaged. If the drive does not appear there at all, even after you swap the cable and USB port, I’d start thinking about physical failure. At that point, a lab is often the safer route.
What I’d use for recovery
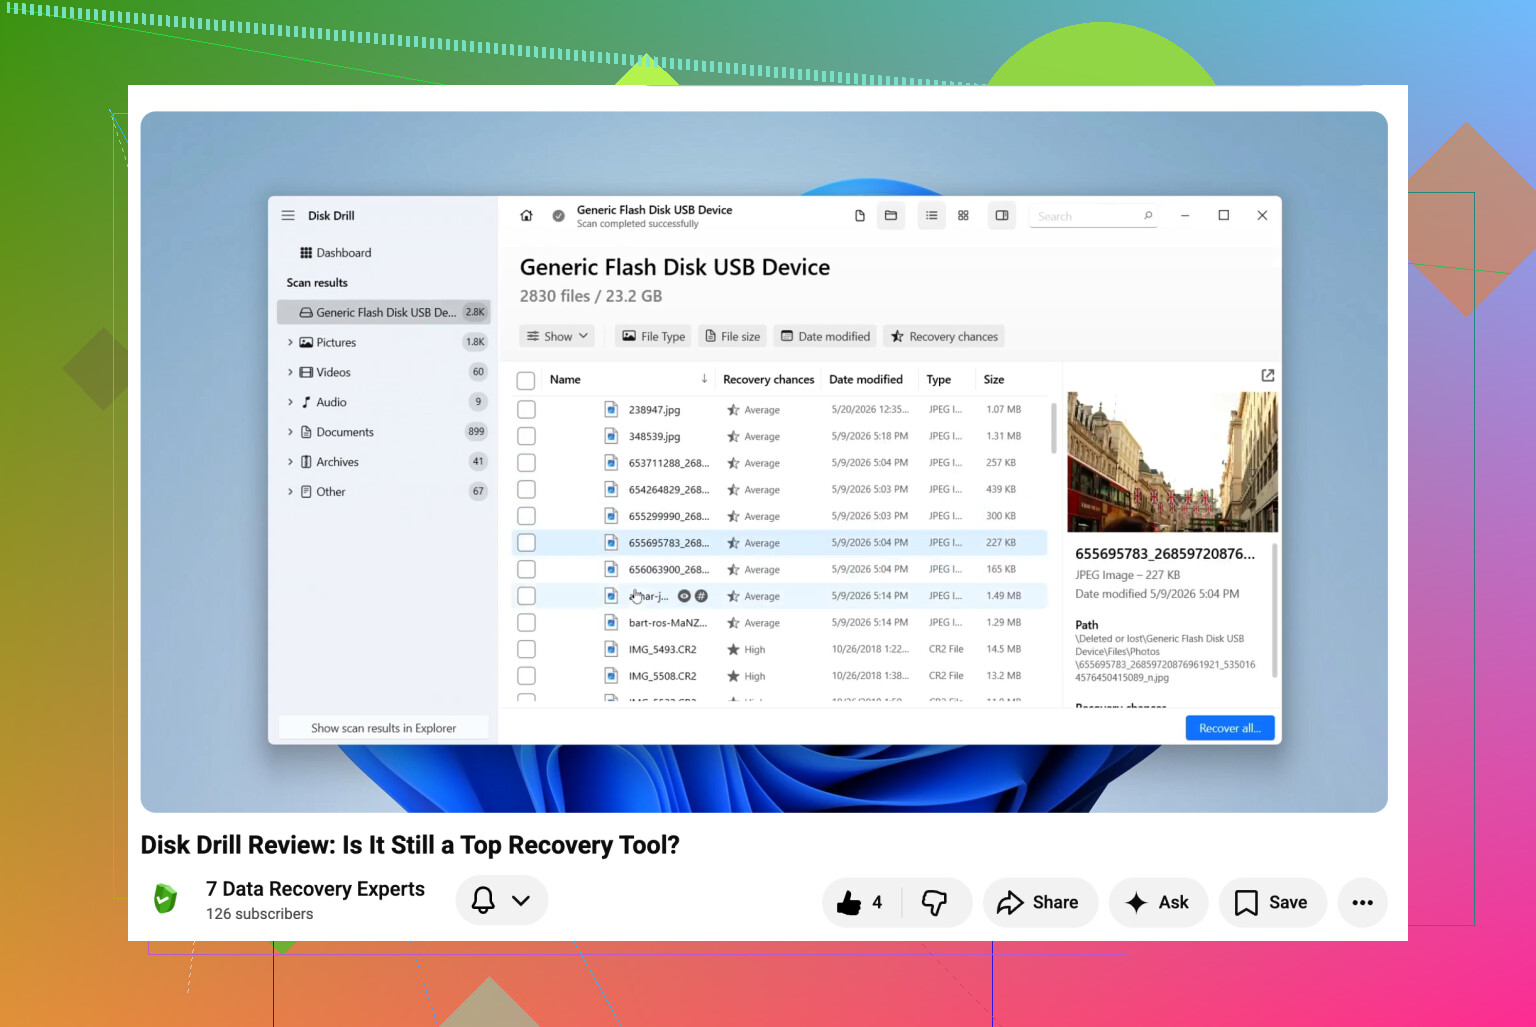
I’ve tried a pile of recovery tools over the years. For WD My Passport drives, Disk Drill gave me the best results overall. It works well when files were deleted, but I’ve also used it on RAW partitions and on drives people formatted by mistake. It handled NTFS and exFAT fine in my case, which covers a lot of My Passport setups.
How I’d do it
Install the recovery app on your computer’s internal drive, never on the WD drive you’re trying to save.
Connect the My Passport.
If it’s slow, freezing, clicking, or dropping connection, make a byte-to-byte backup first inside the app. I do this any time a WD external starts acting off. Scanning an image file is safer than hammering a weak disk over and over.
Select the drive, or the backup image, and start a lost data scan.
Use the full scan option. A quick pass misses stuff. I learned this the annoyng way.
While the scan runs, look through the found files. I usually check “Deleted or lost” and “Reconstructed” first.
Use preview before recovering. If a photo opens, or a document preview looks normal, I treat it as a strong sign the file is intact.
Recover the files to a different location. Use your PC, another external drive, or cloud storage. Do not write them back to the Passport during recovery.
One thing people skip
If your drive keeps disconnecting, don’t keep rescanning it ten times hoping for a better result. I did this once and made things worse. Clone first, scan second. You get fewer surprises that way.
After you get the files back
Set up backups. Seriously. WD points people toward Acronis for automation, and that’s fine if it fits your setup. What mattered more for me was having the same data in two places. External drives fail. Good ones, cheap ones, old ones, new ones. Brand reputation helps a bit, but it doesn’t save your files on the bad day.
If the drive shows in Disk Management with the right size, you still have a shot. If it vanishes from Disk Management entirely, starts making odd noises, or disconnects every few seconds, I’d stop pushing it and think about a pro recovery shop before the damage gets worse.
If the drive spins up and shows a letter, I’d check the easy stuff first. Different USB cable. Different port. Different PC. WD My Passport cases and cables fail more often than people think, and people blame the disk.
I slightly disagree with @mikeappsreviewer on one point. I would not jump into repeated full scans right away on an old drive. First, read SMART with CrystalDiskInfo or GSmartControl. If you see reallocated sectors, pending sectors, CRC errors, or temp spikes, treat the drive like it’s unstable. If SMART is unreadable through the USB bridge, that tells you sometihng too.
If it mounts, copy the most important folders first. Photos, docs, tax files. Do not sort and organize yet. Grab data fast. If the file system is damaged or files were deleted, then Disk Drill is a solid next step. I like it more for sorting recovered files by type and checking previews before recovery. Saves time.
If the drive is clicking, slow as hell, or disconnecting mid-read, stop. No chkdsk. No format prompt. No WD utilities. Those tools are for healthy drives, not sick ones.
Also, if you want a quick walkthrough, this Disk Drill recovery video guide for external hard drives is easier to follow than most text posts.
One more thing. Some My Passport models use hardware encryption in the USB bridge. If you remove the disk from the enclosure, your data might look scrambled. People miss this alll the time.
I’d add one thing neither @mikeappsreviewer nor @sognonotturno really stressed enough: age alone can make an old My Passport flaky even if it was “stored safely.” Lubricants dry out, heads stick, USB bridge boards get weird, and old power draw issues show up on modern ports.
So before doing any recovery at all, let the drive stay connected for 10 to 15 minutes and just observe it. Does it spin normally? Does it vanish from Explorer after a minute? Does it get abnormally warm? Those little behaviors matter more than people think.
I also would not run CHKDSK first, even if Windows begs for it. Sometimes people see “scan and fix” and click it out of habit, then wonder why the folder structure got even messier. Bad move on a drive you care about.
If the disk is readable enough to browse, I’d actually skip fancy tooling at first and manually copy the irreplaceable stuff in small batches. Not giant drag-and-drop jobs. Do photos folder by folder. Same with docs. Huge transfers can fail halfway and stress a marginal drive more than needed.
If the file system is damaged or folders are missing, then yeah, Disk Drill is a sensible option because it handles external drive recovery pretty well and lets you preview what’s still intact before restoring. That part saves a lot of wasted time tbh.
One caveat: some WD My Passport units have that USB-board encryption mess, so if the enclosure electronics are failing, recovery gets more annoying than a normal bare SATA drive. That’s why opening the case is not always the smart “DIY” move people on YouTube pretend it is.
If you want an example of a similar WD external drive recovery case after a drop, that’s worth reading too.
If it clicks, spins down, or keeps disconnecting, stop messing with it. At that point every extra attempt can make recovery harder, maybe impossible.

One angle I’d add to what @sognonotturno, @yozora, and @mikeappsreviewer said: check how the drive identifies itself before you do anything heavy. In Device Manager or on Linux with lsusb, see whether it shows up as a normal WD bridge/device name or something generic. If it comes up with weird capacity, no serial, or keeps re-enumerating, that points more to bridge/electronics than file system damage.
I also slightly disagree with the “let it sit powered for 10 to 15 minutes” idea as a default. On a very old marginal drive, extra powered-on time is still wear. I’d rather connect it, verify detection, and either copy priority files immediately or make an image as soon as possible.
Another useful check: listen for pattern, not just noise.
- smooth spin + steady access = maybe logical issue
- repeated spin up/down = power or bridge trouble
- rhythmic click = stop DIY
- beeping = possible head stiction or power issue
If the data is truly important, skip file-by-file recovery at first and think in this order:
- Verify detection and size
- Image/clone if instability appears
- Recover from the clone/image
- Only then experiment
Disk Drill is fine if the drive is stable enough to read. Pros: easy preview, decent partition/file-signature recovery, good for sorting photos/docs fast. Cons: not the best choice for deeply failing hardware, long scans on weak disks can be rough, and recovered filenames/folders are not always perfect if metadata is damaged.
If Disk Drill struggles, people also try R-Studio or UFS Explorer, but those are less beginner-friendly.
Big thing: if this My Passport is one of the models with USB-board encryption, don’t separate the disk from the original board unless you already know the exact model behavior. That mistake turns a recoverable situation into a much uglier one fast.